
Recently, I moved my WordPress blog(the one you are reading now) from a shared hosting server to AWS LightSail.
As a small blog owner, I always look for a cheap, fixed cost hosting solution, and LightSail happens to fit the bill.
Why LightSail?
Shared hosting is a cheap option, but have adverse effects on performance. It all depends on the users who share the server.
A Lightsail instance is a virtual private server (VPS) that lives in the AWS Cloud.
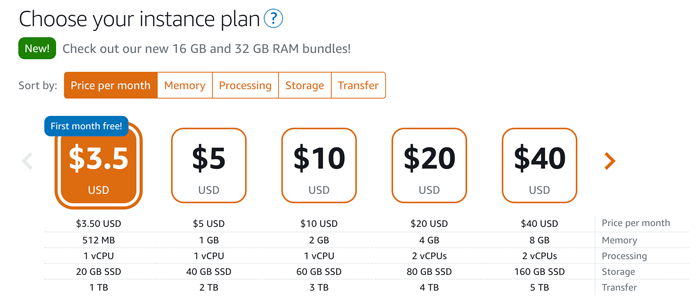
The cheapest plan gives you 20GB SSD storage and 1 TB bandwidth and that’s for $3.50 USD(at the time of writing).
You get a dedicated virtual private server, and access to the amazing AWS infrastructure.
In addition to this, you also get a static IP address, DNS management, SSH access, load balancing, automated backups(snapshots), etc.
EC2 is another option where you pay for your usage only but will have to configure more things manually. And you will be charged for the bandwidth. Compared to EC2, LightSail instances have a flat cost that includes bandwidth.
Installing WordPress
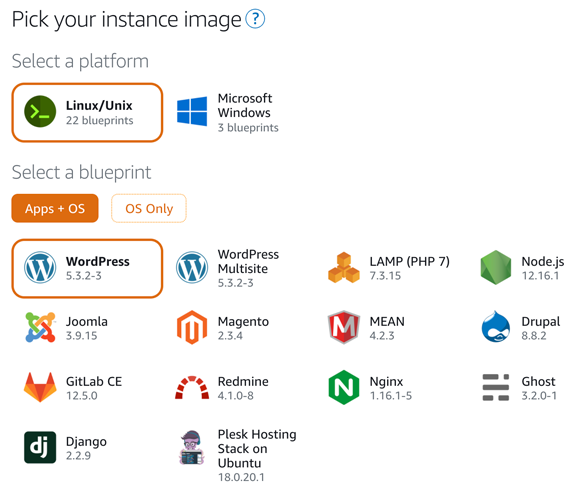
To install WordPress, you should log in to LightSail homepage and create an instance first. This will take you to the below screen where you should choose your platform and the blueprint.
Select the instance plan, provide a unique name for your instance, and click the Create Instance button.
This will install a Bitnami WordPress image in your instance.
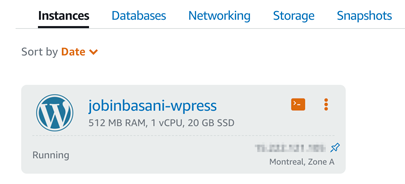
Your instance will be ready in a few minutes and will be in the Running status.
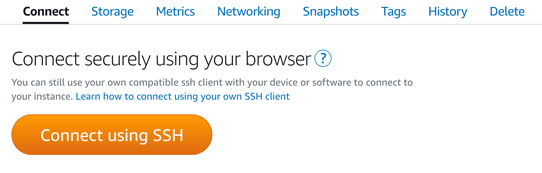
Click on the instance and you will be taken to the screen that provides you an option to SSH to this instance via the browser.
Once you open an SSH session, run the below command to get the WordPress admin password
cat bitnami_application_password
Use this password along with the username as user to access your admin page at http://<your-lightsail-ip>/wp-admin
Once you are in the admin area, you can import your existing blog to this new WordPress instance.
After this, run the below command
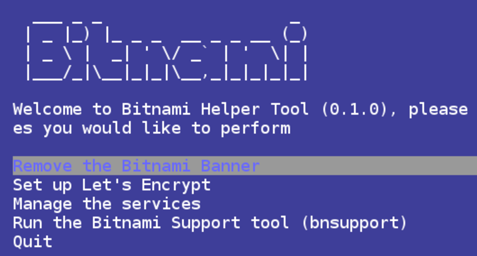
sudo /opt/bitnami/bnhelper-tool
This will launch Bitnami’s helper tool that allows you to remove the Bitnami logo that’s added at the bottom right of the page.
You can also ssh to this instance directly from your machine by downloading the keys from the Lightsail account page and using them as the identity of ssh connection.
ssh [email protected] -i /path/to/downloaded/keyfile.pem
Create a static IP
The next step is creating a static IP address for your instance. The static IP is needed for setting up DNS entries correctly.
To do that, navigate to the Lightsail homepage and click on Networking and the Create Static IP button.
Provide a unique name to identify the static IP, and attach the WordPress instance to the IP.
Static ip’s are free only when attached to an instance!
Create DNS Zone
Now that you have a static IP, the final step is to create a DNS zone that allows you to link your WordPress instance with your domain name.
From the Lightsail home page, click on Networking and then Create DNS zone.
Provide your domain name, and LightSail will give you the nameservers that you need to configure your domain provider with.
If you don’t want to update your domain providers’ nameservers, you can just add an A record in your current DNS entries with the value as the static IP you generated.
Email configuration
Lightsail instances don’t come with an email server, so the WordPress functionalities that require sending an email won’t work. The LightSail WordPress installation, however, comes with the WP Mail SMTP plugin pre-installed. This plugin works great with multiple providers like Gmail, SendGrid, etc.
I ended up using sendgrid.com which provides a generous amount of free mails and a great UI to manage the emails.
That’s it, enjoy your new WordPress instance!